No, this topic is not about bending oak, just bending garden rail tracks with oak - and since 2016, also with 3D printed plastic.
Why a rail “G” track bender
Having get Peco track code 250 with rails in silvernickel, it is difficult and costly to supply a track bender, the only one working on code 250 rails appears to be the Swiss Train-Li.
As silvernickel is very springy and the rail width is lower than for code 332, it is nearly impossible to bend this track manually. It returns to a position very far from where you bent it. One single rail could be bent at a radius of ~400 mm and return straight ! In fact, as for HO rails, they could be supplied rolled and I think that could be quite helpful.
You can easily found single rail bender, but that seems fairly less practical than a track bender.
So, after some thinking, I’ve decided to built a track bender of my own design, the slight problem being that I no longer had any workshop.
I decided to use components already available at home and easy to work with my limited means:
- Oak spare from bookshelves building
- Roller bearings (I own a whole bunch of those, because they are the basic components of the CNC machine I built)
- Miscellaneous screws and bolts
So, as I usually do, I seated facing the computer doing some drawings on Autocad.
For a few years now, the drawings of this bender were available for a construction in oak. There is now a new 3D printed version with the same geometry. see the PlasBender paragraph.
Photos
You shall see below the result of the design work. The bender is quite stiff and working well. On this revised version, there is two flanged bearings on the sliding bar. These flanged bearings help to self-maintain the bender on the track and ease its use.
And the result:
This prototype version is not adjustable (it is glued and screwed).
I have tried with good results to weld the rails joiners before bending. The bender creates a slight discontinuity at the junction but this is acceptable and could be somewhat corrected by hand.
I discovered that silvernickel have a major advantage over brass, its thermal conductivity being much lower than brass, it is easy to weld with a moderate power iron (less than 100w).
Another solution to avoid the straight part at the end of a rail is to cut it.
Bearing are ZZ type (Shielded), never oil them, that shall dilute and remove their grease.
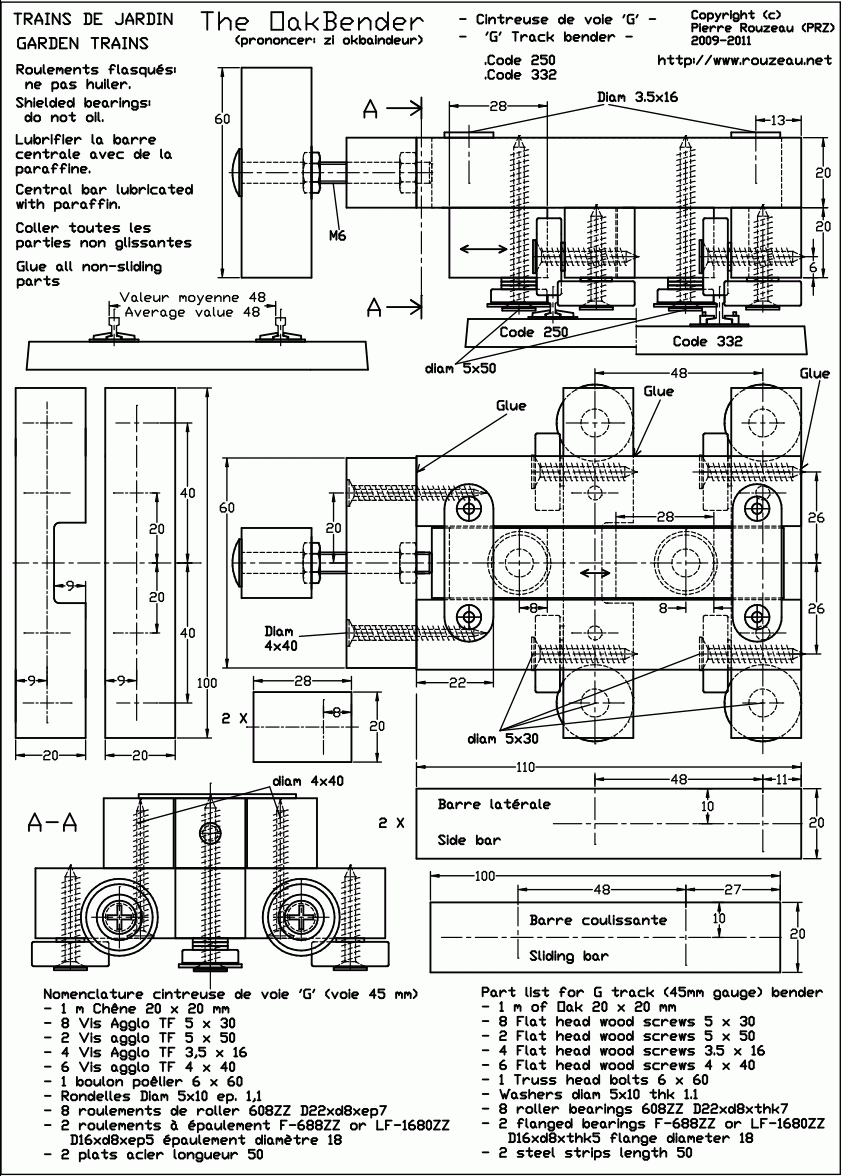
Plans
Plans are below in non adjustable version quite similar to the prototype.
For recommended dimensions, it shall work on rail of gauge 332 or 250 for which the distance between external rail face and internal rail face is around 48 mm (45 mm + 3mm railwidth). It was not verified for code 200 rails and clearances may be unsufficient. Also, width shall be below 48 mm
Please note that I have only tested my bender on Peco silvernickel track (indeed, it is dedicated to).
Tips
- Use hardwood only, oak is very good but finer grained wood may help to be more precise
- This is mechanic, not wood structure assembly, you hall be very precise while drilling. Though take care only of the functional dimensions, the others are not that important:
- Height of the rollers with horizontal axis
- Distance between the rollers vertical axis (track width + 1 top rail width)
- Write precise marks and hammer a nail to precisely position the holes before drilling.
- Drill with a vertical stand only
- Hole for wood screw diam 5 shall be diam 3.2 (that’s Oak !)
- Hole for wood screw diam 4 shall be diam 2.5
- Set paraffin on screw before assembly
- Alas, wood is an heterogeneous material and your hole may slightly move away. To correct it file it oval with a drill bit in the direction you want to move your screw, then insert a toothpick in the opposite, impregnated with white glue. That may allow to correct the position by 0.5–0.8 mm.
- If you hole is too far away (1mm or more), drill a 6mm hole, glue a wood pin, wait and start again with care.
- Use water-resistant white glue
- You may slightly adjust the height over the track with washers of different thickness.
- Glue the parts (with a weight to maintain) before setting the screws. It is easier to adjust position.
- Central bar shall slide and shall be lubricated with paraffin. Sand as needed.
- Roller bearing could be found everywhere someone is selling rollers. Use the lowest cost, they are fairly sufficient for the very low load used here. The lowest cost I get was in a supermarket 4.50 euros the 16 bearings. Beware, size is standardised but children rollers may have lower sized bearings.
- Flanged bearings (there is only two) are a bit more difficult to found. I get mines at Conrad for 6.25 Euros each under the reference 215295-62. They are 688 bearings with a flange (sometimes referred as F-688).
- Time to built between two and three hours, depending your equipment and skills. Remember the bearing shall be precisely positioned.
Use
Bend your track progressively with a lot of back and forth movements and by increasing the push bar displacement step by step. You shall not force the movement. Note on a paper the final tag used on the bender to obtain a given radius. This is specific for each track and material. Silvernickel track does have a lot of elastic return.
After bending a section, you will have to shorten the internal rail. This can be done by cutting it with a Dremel tool.
The 3D printed version, the ‘PlasBender’
Using approximately 90g of PETG filament and needing 4h to 6h printing (depending the speed of your printer), it is faster (you will do other stuff during printing) and easier to built than the oak version and doesn’t need any adjustment. As the geometry is nearly the same as the oak version, there is no difference in use.
A PLA with good mechanical resistance may be tested and will have the advantage to be more stiff than PETG version, which tend to flex a bit under load. However it shall be understood that this is a mechanical part submitted to significant loads and I am not sure of durability of a PLA based construction. New ASA filament may be a good proponent for this, as being a bit more stiff than other plastics.
Design is done with OpenSCAD and it is published on GitHub https://github.com/PRouzeau/Garden-train-G-track-bender with stl file and full BOM
Printing requirements:
- Material: PETG, ASA, Polyamide (Nylon).
This is a mechanical part, so the print shall be strong:
- Layer thickness: 0.25 to 0.3- higher layer thickness improves strength -
- Fill-in 100%
- 4 to 6 walls
- 5 layers on bottom and 5 layers on top.
- Layers shall be well fused, so use high temperature even if this creates stringing.
On most printers, you may have difficulties to extrude PETG with 0.3mm thickness at a speed exceeding 50 mm/s. Note that this depends from the PETG you are using, some are easier to extrude than others. Don’t use dark colors and if you have adhesion problems, reduce the speed (not the layer thickness).
My own PETG printing time was 3h30min on my own PETG optimised delta D-Box and about 3 hours on the Bambu Lab X1C with 0.28 mm layers.
Commercially available track benders
Massoth 8105101 329 Euros
Train-Li Easy bend duo track Video 370$